Supply and Demand Trading in 2026
We have been trading supply and demand strategies for over ten years, and they have stood the test of time remarkably well. Supply and demand is...

As a technical trader we have all heard about keeping a trading system simple and effective, and it is not a surprise to see most of the successful traders often glaring at clean (read naked!) charts with price action on the forefront rather than fancy colorful indicators.
I am not a stark opponent of indicators, but do seem to cringe when I see multi colors on the chart that overshadow good old price action. You should keep indicators to a minimum and only use them where they make sense.
In this article I want to lay out a simple trading strategy based on literally just a single moving average and some basic knowledge of how price action works. You are free to adopt it of course, but the real idea is to set an example for how simple trading really has to be.
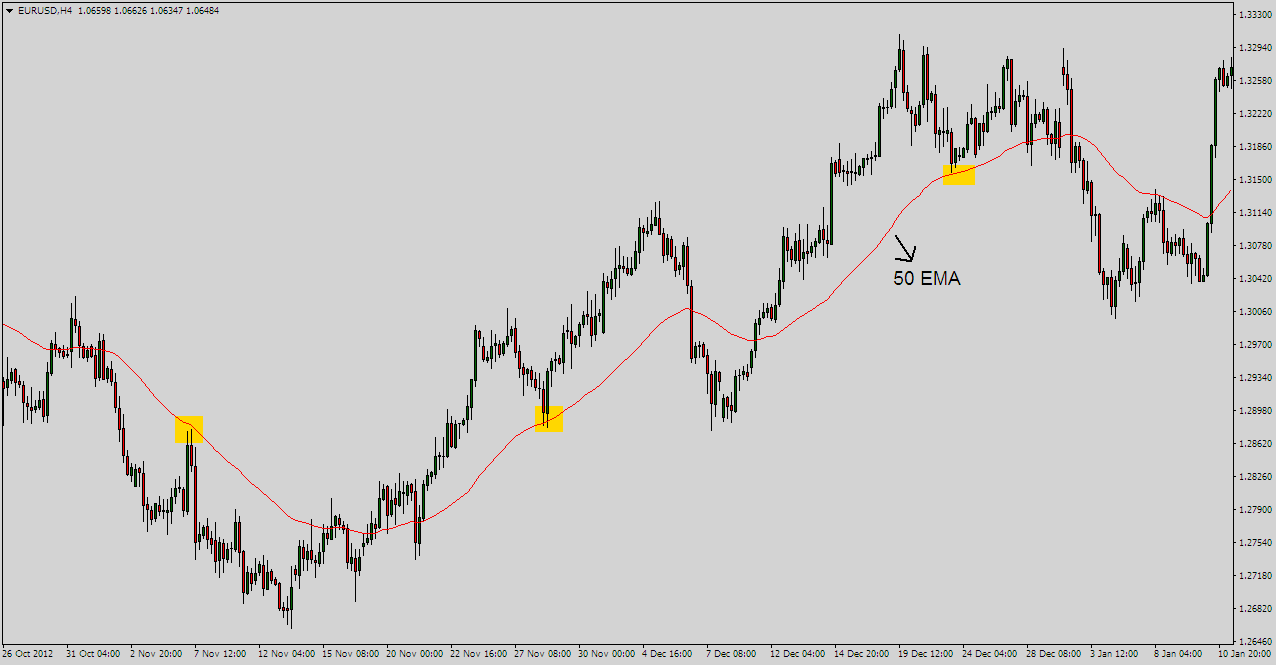
Starting with a clean chart with nothing but candlesticks / bars, lay out the 50 exponential moving average (EMA). Believe it or not, we are ready to go!
Things get interesting for us, when price returns back to the 50 EMA after having spent some time away from it.
If you’ve followed moving averages closely in the past, you would likely understand that I am basically hinting at trending price action. When price runs sideways, moving averages tend to close in and will get entangled with the ongoing live action also getting hit quite frequently by price.
For moving average based systems, that can be account killing. As a simple filter to this problem, you should only be interested when price touches the 50 EMA after (relatively) spending some time away from it, as when it shoots off into a decent trend. The chart above illustrates this.
Let’s look at some of the points on the same chart that we might be interested in:
Notice how each of the three touches of the 50 EMA marked above result in a bounce, and that they occur as a follow-up to a strong move prior. It is not uncommon for price to bounce harder from the 50 EMA, the more time that it spends away from it.
We have already talked about an important filter that can help you quickly eliminate the weaker setups from the stronger ones: Trading only in a trending market where price does not hit the 50 EMA in quick succession.
Let’s also talk about another extremely crucial filter: Horizontal support and resistance levels!
I am excited every time I see price pulling back to the 50 EMA following a strong move, but my fingers will not roll over the order button until I find the point where price touches the 50 EMA is lying in confluence with a horizontal former support and resistance level. I have found this to be an amazing filter. Sure I miss a few trains, but the ones I take, I sure as hell enjoy the rides – well mostly!
For each of the three charts above, notice how we have the desired touch of the 50 EMA, but it the touch-point also coincides with a clear former support or resistance area.
If you can learn to combine the two, and be weary of instances where the 50 EMA is too caught up with recent price action, you have a mighty effective trading system that is simple and effective.
Now that we know the dynamics of the system itself, let’s look at the two ways that I believe you can trade this method, ranging from a conservative approach to an aggressive one.
The aggressive approach:
This approach allows you to execute an order upon the touch of the 50 EMA. The stop loss will need to be placed arbitrarily a few pips above or below your entry, as the case may be. Notice that such a trigger would have worked phenomenally in the third (last) example posted in the previous section. Price hits the 50 EMA and bounces hard.
Well these will mark the good times, you know where you can put your shades on and act like the hero in your story. Often times price will hit and bounce the 50 EMA on the touch, not necessarily giving price action signals for the conservative traders (hint: alternate approach). The flipside, of course, is that there is considerable risk in shooting blind trades and keeping arbitrary stops.
Truth is, you will never really know for sure how much of a distance in pips do you need for a secure stop loss. Keep it wide enough, and you destroy the purpose of entering at the source (the 50 EMA where you expect the bounce) by spoiling your risk:reward ratio. Keep it too tight and you risk getting taken out, without necessarily being wrong (and that’s painful as heck!)
It will really come down to the market you are trading, your experience with the method and blind trading and of course the strength of the setup itself.
The core advantage you get with a sizeable risk : reward ratio can make up for some extra losses you might bag from taking this aggressive route. Not for the faint-hearted though, or the inexperienced.
Take this setup for example:
We have a pullback to the 50 EMA and beautiful confluence with a wedge pattern and horizontal support and resistance level. And well, price does what you would expect, only that it shoots a little further above the 50 EMA than what I would be comfortable with. A stop here needed to be really wide to accommodate for that fake move up.
The conservative approach:
For those who like their peace and relaxed lives, there is the alternate approach, where you can wait for a definite price action signal at the bounce of the 50 EMA in the form of a candlestick pattern like a pin bar or an engulfing bar pattern.
If you notice this setup posted above is a textbook setup for conservative traders. It shows a nice pin bar off the 50 EMA and a horizontal support and resistance level.
You can now take your trade as you conventionally would, if you were trading the pin bar. That is, taking an entry at the break of the pin bar with the stop loss (objectively!) placed at the break of the other end of the bar.
Waiting for a price action confirmation adds a layer of strength to the setup, but will likely not give you as juicy risk : reward as in the aggressive approach obviously due to the delayed entry.
Personally, I prefer to wait for a price action confirmation because I have been an avid fan of candlestick patterns my entire trading career. Although very occasionally I will also take touch trades when I see a mountain-load of dead-obvious confluence of support and resistance areas lining up at the touch point.
Well, that really just sums up this ultra-simple trading strategy. In our pro area, you will learn our exact trading method step by step with more price action and technical analysis tips and entries.
Let us know in the comments section below if anything is unclear or you have further questions. Happy trading!

We have been trading supply and demand strategies for over ten years, and they have stood the test of time remarkably well. Supply and demand is...

3 min read
Choosing the right trading journal is essential for traders wanting to analyze performance, refine strategies, and improve consistency. In this...

3 min read
“95% of all traders fail” is the most commonly used trading related statistic around the internet. But no research paper exists that proves this...