In this video, I explain a fakeout trading strategy with a top-down multi-timeframe approach.
Below this video, you will find the transcript to the video. This is the first time we are adding such a transcript. Let me know if you find this helpful or not 🙂
Video Transcript
Video timestamp (00:00):
Let’s talk about fake breakouts and how to implement a fake breakout trading strategy.
Video timestamp (00:17):
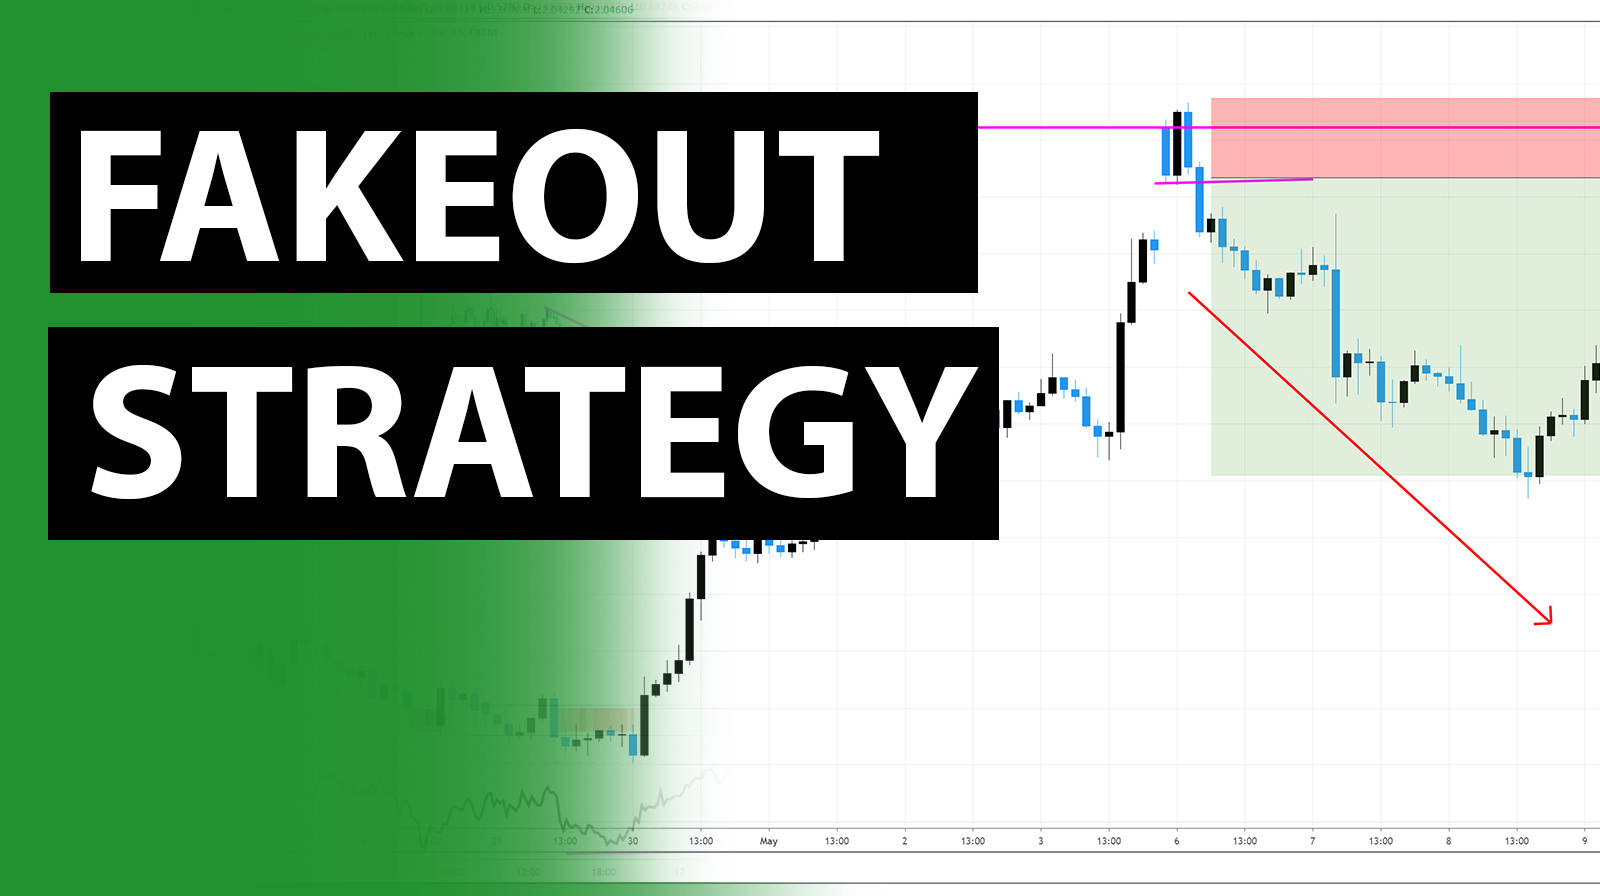
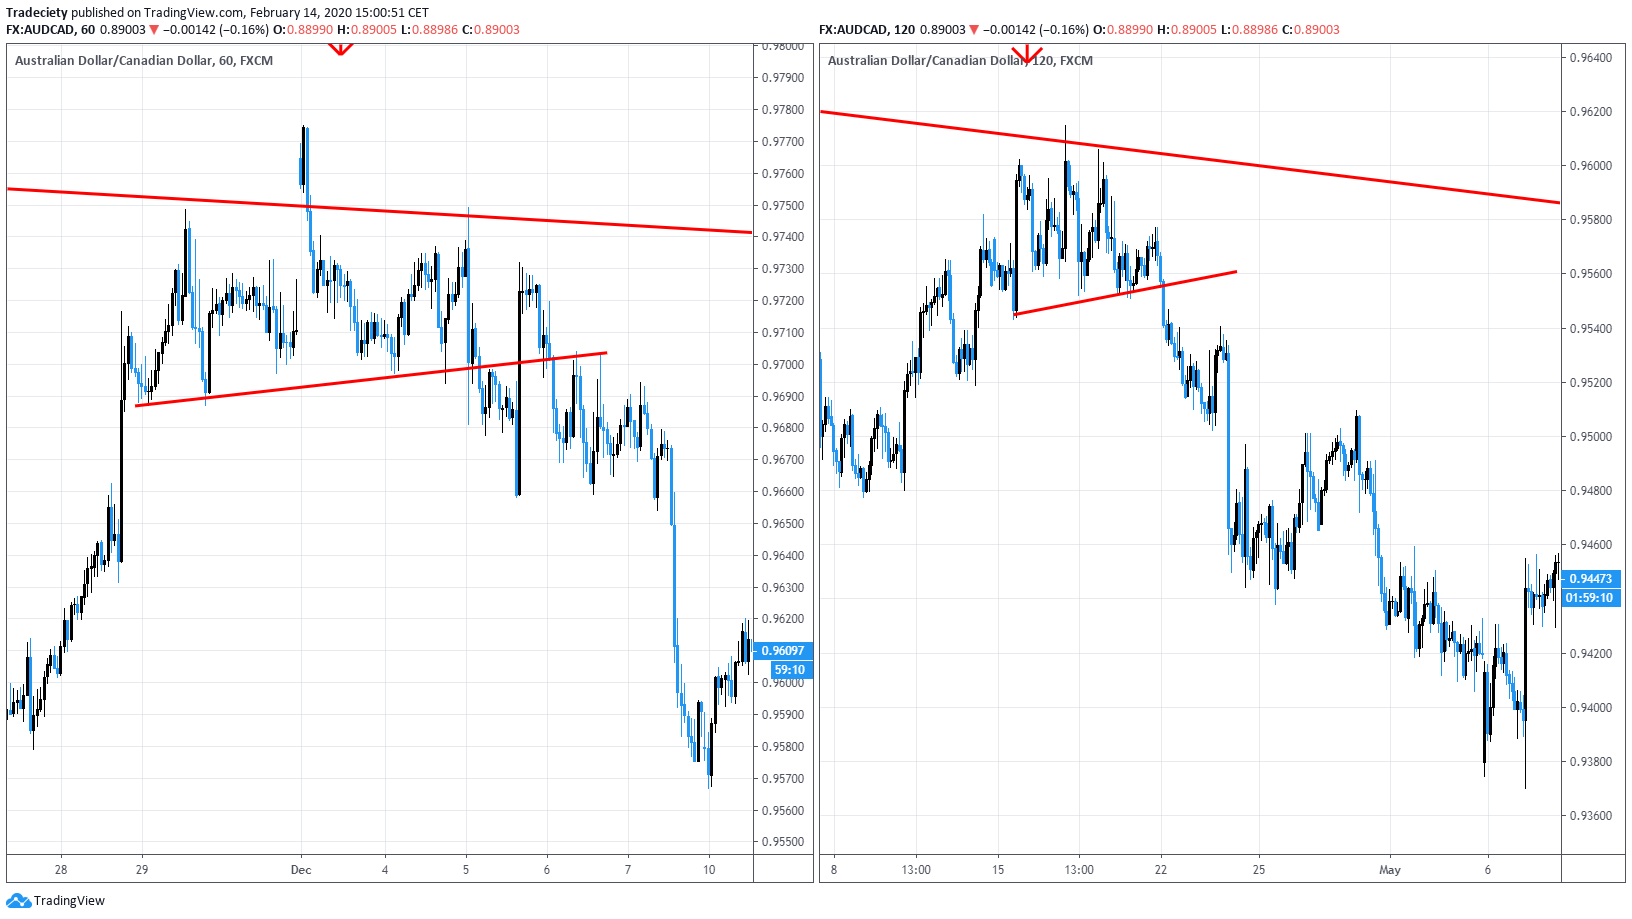
Welcome to a new video. And this is going to be a top-down approach. We are starting here on the weekly, we have another example of where we’re going to start on the daily and the ideas that we look for failed and fake breakouts on the higher time frames. And then we go down to a lower timeframe to time our entry. And for that, what we want to do, it’s very, very simple: We look at the most important swing highs and lows that really stand out such as here. We want to have very, very important turning points where the market went from one trend direction into the other. And that is the area that we are going to look for failed and fake breakouts. You can see we have a bunch here lining up. We have one here, we have one here, we have one around here.
Video timestamp (01:06):
And I think this is good enough. Maybe we can do another one here. This is what we are going to look for. And what those things all have in common is that you have your first initial swing point here and then you have a second swing point which goes beyond the first one. This is what we are looking for as a failed and fake breakout here. Again, we have our first swing high and then we have our second failed breakout. Let me make this a little bit shorter so that we can find it on the lower timeframes. Here again: first swing point, second fake-out swing point, fake-out. Then we have a lower swing point and then a fake out here and we can go to a lower timeframe. You could use this on a four hour to two hour, one hour, whatever works best for you.
Video timestamp (01:53):
And then we’re going to look for those areas that I just drew in. Now we are on the four hour time timeframe and this is where I drew in the first swing point. You can see he is not a level and we didn’t just wait for the price to get back to the level. Here is another swing point. We are going to see when is the market coming back to those levels. Here is that the first one and what are we going to do is we basically look for patterns that we could trade around those fake breakouts so you can see the market moves into the area, puts bag, moves into it, and then it seems like it is posting here a very good flag pattern or a wedge pattern. We have a very good flag pattern.
Video timestamp (02:39):
Something that we didn’t have here on the first attempt. There was no pattern, there were no technicals that we could have used. And then simply what you going to do is to wait for the market to turn out or turn around. You can see first it breaks through the flag or the wedge. And then it also has this inside pin bar here. When we zoom in, you can see an inside pin by is often a sign of rejection and then it fought shadows, just downward move. And it is all happen after the failed and fake breakout on the higher timeframe. No, it’s more forward to see where the other one’s lineup. You can see we have another swing point that we are then just going to wait for the price to get there. Let’s see, let’s see, so here’s the second time from the first swing point that we identified, and again we have some type of maybe a flag pattern or a wedge, but we also can use a horizontal area which are usually prefer in my own trading and is this what I mostly teach in the master class as well, so he can clearly see how the market is trying to push into the new highs here.
Video timestamp (03:49):
But it does fail. It gets rejected here with a very strong outside pin bar. So we have an outside bar and a pin bar altogether, or at least a rejection after pinworm. Then you can see we have a break and a retest below the structure and then the market moves and starts this new downtrend. And again, this is the fake breakout that we saw on the higher time frames and on the lower timeframes. It’s very, very common to see that the price establishes patterns around those fade breakouts. So that is what we are waiting for. Obviously we could use other tools, I also use the 50 period moving average in my own trading, which helps us time trades as well. And you could use the trend rider, but most importantly is that you don’t trade failed and fake breakouts, uh, just on their own.
Video timestamp (04:37):
You need to really wait for the pattern to emerge on the lower timeframe. Now we have another swing load that we identified and let’s see, we’re just waiting for the price to get back to those levels. Can see it does take sometimes a very long time for the price to get there, but it’s, it doesn’t hurt to just draw in those important swing points and then wait for the price to get there. So you can see this is where the first time the market moved into the first low that we identified and you can’t against. We have some type of a breakout pattern in here, a breakout and then a move higher. The market doesn’t move a lot on this initial under his first fake breakout and not all traits will be great winning trades, but you can see whether the market stop at a previous very, very important.
Video timestamp (05:24):
A support area turns into resistance. So with some trait management you could have exited your trade there. Then you wait for the price to move into the second a fake breakout area. So this is the one that we identified on the higher timeframe. Again, now you can see we have another pattern, another horizontal breakout that we could use. Probably we can also use our moving average here can see that the market breaks above and retest the moving average as well. So a nice add on to have, we could even use our trend rider. You can see on the breakout the trend writer here turned green. The momentum histogram will also be green in this case you can see that here very nicely and then you could have written this trend and till the market hit the previous supply area in here. And again, it all started with the move into the previous swing point, which was around here. The market dipped into this reversed on the spot and then traded higher.
Video timestamp (06:24):
Here you can see the market comes back into this level a second time and we can probably looks like we can draw some, a trendline in here to describe the price action. So if we get this right, you can see some type of trend line. We could also probably use a horizontal breakout level of down here. So we have some type of confluence with some resistance here. Then we have our classic break and retest study. By then the trend rider has also been green broke above the previous high here and then started this rally upwards. And again, it all started with this move into the previous swing point, which then led to a fake breakout and a reversal to the upside. We can also obviously use a daily four hour or a daily one hour combination. So now we are on the daily chart and again, we want to look for the most important swing points, that really stand outs where the market did make a strong reaction or did show a strong reaction.
Video timestamp (07:25):
Here on the first we can see it when we zoom in, can see here was the first swing point and the market moves back into this area, moves lower from it. So we are, when we go to the lower timeframe, we want to see the starting point here. And then this is the wet area of the fake breakout comes in. Then let’s see what else we can find. So here you can see, although we could draw a level in here, this is not a good enough level. We want to really see swing points where the market quickly turns. You don’t want to see the market stick around at a level for that long. It doesn’t show a very strong level. You really want to have a very strong reaction to find important swing points. Then we have probably, let’s see, so we have some in here.
Video timestamp (08:13):
This is also a very important example. You can see we have a strong swing point here. The market comes back to it, but it just blows through this. And when we go to a lot of time, you will see that they ask then obviously no pattern around it, so not in initial fair breakout and the market just blew through it. Very, very important. Then here we seem to have something, the market has a previous swing high, oops, let’s make this horizontal, comes back into the lever, then turns lower. And this is something that will repeat itself over and over again. You can see that here are very nice, fake breakout and obviously not all swing points. We’ll be retested again. The market will not come back to your level, uh, in the foreseeable future. You can still leave those levels on your charts.
Video timestamp (09:02):
Just keep them there and wait for the price to get there. It’s a nice way to stay on top of things, to not miss important levels. So here you can see some failed breakout initially. So this will be interesting to analyze at all. So here is something that is really worth checking out. And then here the market comes into this as well. So there are lots of fake and fake breakouts. This is a very, very common pattern to see across all markets, especially when you are a Forex trader. So we are starting with the first swing point here and then we just wait for the price to get back to this area. And in the meantime you can see here is another lever that we drew in here.
Video timestamp (09:54):
It started in the past, but trading view only has so much data on the lower timeframes. But let’s see what happens here. So in this case, probably it will be a little bit harder to time because around here we don’t have an initial pattern. So there’s no sideways consolidation, there’s no horizontal lever, there’s no flag, no triangle, no wedge. So this will be harder to time. And I would not recommend to just trade those areas blindly. There will be plenty of new opportunities and let’s grow forward to see when the market comes back into our lower level. So here we are now establishing another swing area and we didn’t just wait for the price to get there. And in this example, you can see the market initially dipped way below it, but then eventually it came back, gave us this inverse head and shoulder, very dirty head and shoulder.
Video timestamp (10:46):
The left shoulder here, the right shoulder is very high. Regardless, we can still draw a lever to define a pattern, which is the most important thing. And then we just wait for the breakout. And then the Mark, the market really took off. So again, this happened after the market broke, lower, reversed back into the range and then started a fake breakout reversal. Now let’s see when we get to the other one. So here we are establishing a swing point and then we wait for the market to get back there. He has another first swing point and we then just wait for the market to get back there. And sometimes it does take a while and you can see here, this is what identified on the higher time frames. In this example, you probably, you didn’t see the breakout until here. So this is the first time the market really had your fake breakout.
Video timestamp (11:36):
And let’s get this off and we can also find some type of head and shoulder. This time we have a tilted neckline and you can see left shoulder, head, small, right shoulder, the breakout and the retest. And then the market collapsed eventually afterwards. We haven’t ever another flag pattern, which we learned about in the last video. So here, nice flag pattern. So there are multiple ways how you then can trade those of fake breakouts once they occur. And once the market really shows you a reversal and you really want to see that the market is piercing through such a level. So let’s complete our exercise and move forward to those that we drew in. So again, we establish a first swing point here. Here the market comes back onto a previous one that we drew. You can see this as an exhaustion gap.
Video timestamp (12:27):
The market gaps higher then makes an initial move up but then eventually it falls lower and the gap closes and then after the gap close the market did sell off a little bit further again. So we could also use gap closers and exhaustion gaps to time or at traits. Here is then an example where it wouldn’t have worked out. You probably had your level drawn something like this. So in this example, it’s not even sure if he would have entered the trade because the market never really broke into a new high. Maybe if you draw it like this then this would have been your entry and then it, it would have failed. But that’s totally fine. It doesn’t work all the time. You need to cut your loss and then you need to move on, wait for the next opportunity when the market finds its next important level.
Video timestamp (13:16):
And it’s really, really important that on the higher time frames you only draw the most important levels so that you really trade the most relevant swing points. There are obviously many, many swing points that you could trade. But on the higher time frame that’s important. We only stick to the ones that really stand out, the ones that really matter. So currently, the market volatility with the Corona is very high. So the market is not really in a trending face and that is why currently we don’t see too many charts and too many price, uh, market or fixe pears move into those swing points. But, uh, it’s, it doesn’t hurt it. It’s always important to do this exercise, keep your charts fresh. You can see here, does this, where the market, uh, even during those crazy Corona times moved into the level, did two fake outs and I’m always reversed lower from those areas. So that’s really pay off to have marked up the levels, the big ones on your chart, and then just wait for the price to get them. Let me know how you liked this video. Leave a comment, leave a thumbs up, share it with your trading friends and then I will keep making more videos.